It is possible to add constraints to a simulation by entering a Stop Condition. This means that when a cycle reaches the stop condition, the cycle will be stopped. The value of a Path starts at 0 and will be increased when the first shape is reached.
You can enter Stop Conditions as follows:
1. Click the Simulate button (this button only becomes available after you have used the function Detect Paths).
2. Check the option for Stop Conditions: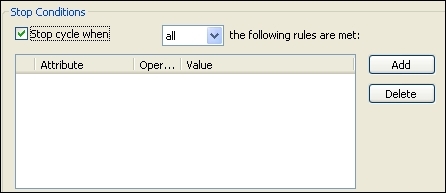
3. Click the Add button.
4. A new row appears in the Stop Conditions box:
5. Click the row below Attribute. A dropdown window opens containing the attributes you have created:
6. Select the attribute for which you want to create a stop conditions.
7. Click the row below Operator and select from the dropdown menu which operator you want to use:
· > more than
·  equals or more than
· < smaller than
·  equals or smaller than
· = equals
·  does not equal
8. At Value you can enter the number at which you want to stop a cycle, based on the operator you have selected.
9. Next you can add another Stop Condition. If you have entered more stop conditions, it is important to select whether One or All of the rules must be met.
All: the cycle is only stopped if all of the stop conditions have been met.
One: the cycle is stopped if one of the stop conditions is met.
It is also possible to remove stop conditions. To do this you must select the stop condition and click the Delete button.
Changing a stop condition is done by clicking the row and changing the relevant part of the stop condition.
Note: You can only enter numbers in a Value column, both positive as well as negative.
It does not matter if you use a dot or a comma to indicate a decimal number. It will be changed to the decimal character that is set in your windows version.
The use of both a comma and a dot in one value will lead to the second character being discarded.